Copyright

(c) 2009 - 2024 (MEM)

Please keep in mind that, unless otherwise noted, everything on my blog is copyright material of some sort. Either by me (as picture taker, writer, creator) or more importantly by the designer of the needlework pieces I present. If you promise to be copyright mindful, my promise to you is to do my best to provide you enough information in my post for you to obtain your own legal copy. Please be respectful of these copyrights and not take business away from our wonderful designers. Thank you.
............. . ."She looks for wool and flax and works with her hands in delight" Proverbs 31:13 NAS


Wednesday, June 15, 2022

Surprise!! More Beading.

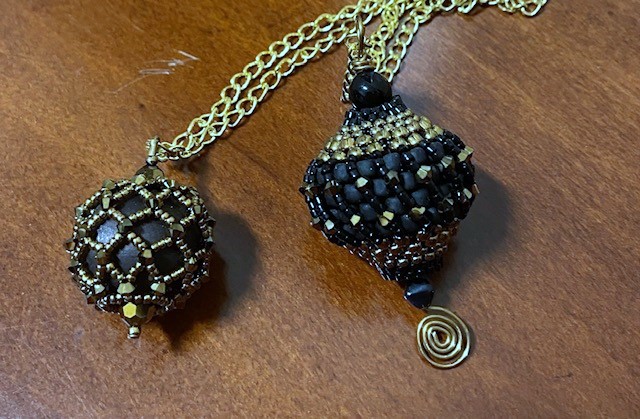
 In the summer of 2013, I took a class at the Rocky Mountain Region Seminar in Grand Junction, Colorado. The class was called Three for One because we got three projects in one class - two beaded beads and a necklace. In class we created two beads as practice for making the necklace. The top photo shows the beads I made (in 2013).  


The necklace project was in my bead project box I am trying to whittle down.


I guess my practice 9 years ago paid off because I did ok with these beads!!

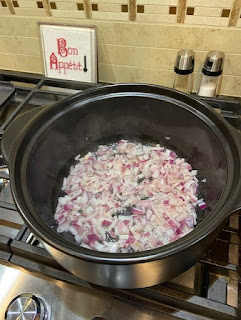
The top one has a coffee stirrer in it to help keep the holes positioned correctly for stringing. The stirrer was too large for my smaller beads, so I just used a twist tie.


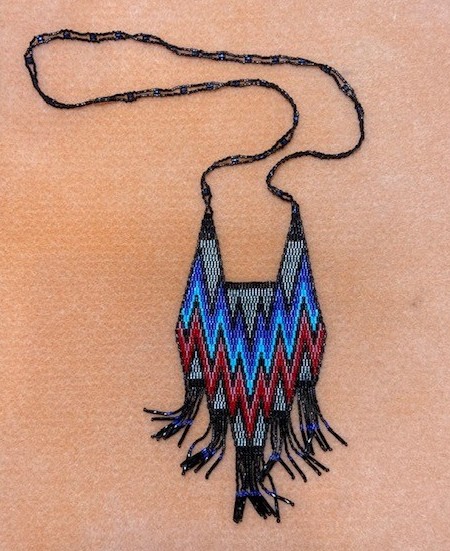
Here is my final result! I am very pleased with it. Now I just need to find an outfit to go with it!!


Also in my bead project box was this cute little pin kit.

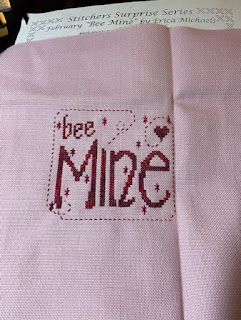
That is all for now, next time I may report on some stitching!!! I have a project on a deadline and should get back to it.

Sunday, June 12, 2022

Super Duo Zippy Wrap Bracelet

This design is from Harlequin Beads and Jewelry and was a Jan. 2018 project from my local bead club that I found in my bead project box. It calls for different colored beads and is called "Superduo Metallic Amathyst Zippy Wrap Bracelet". Designed by Ramona Brummet. I used from my stash, so it is more copper and turquoise than amethyst.


I used a copper button my mom purchased in Arizona during a summer vacation trip from Calif. to New Mexico. I was almost 5 that summer. We went to Philmont ranch where my brother and dad did cub scout stuff. I learned itsy bitsy spider and how to swing myself on the swing. I suspect my dad was getting tired of pushing me on it all the time!!  I also came down with heat exhaustion and the doctor told me to wear my hat all the time. So, I did... inside and out, night and day!

Back to the bracelet. It was very easy to make, but a bit fiddly since you have two strands going at once. I would increase the length of soft flex wire it calls for, I could not get it to wrap three times around my wrist. The instructions are for a 7" wrist, mine is 7 1/2" But, it looks good wrapped two times, so I am happy with it.

Now to see what else is in that bead project box.......


Friday, June 10, 2022

Beaded Bargello Pendant - Finished

 I finished the pendant. The necklace part was a very interesting two needle ladder stitch, and the fringe is a basic fringe with a twisted bugle. Now I just need to find something to wear it with!!


It is made with a three-bead brick stitch, so this helped it go a little faster and I was able to get it done in good time working in the evenings.

You can find more information about this pendant in previous posts.


Sunday, June 5, 2022

Beaded Bargello Pendant

On this post: Still More Beading, I told you a little bit about this Bargello Pendant that I decided to take out of by bead project box and start working on. It is a three-bead brick stitch project, so it increases in size rather quickly. You start at the widest part, and it is about three and a half inches wide. 

Here is my progress so far:


It is from the August 1998 issue of Bead&Button magazine. Designed by Carole Collier and I believe it is in her book Three-Bead Brick Stitch: Necklace Expressions, Seven Fabulous Projects for Intermediate to Advanced Beaders.

Originally, I had all my beads, except the silver set up on my Bead Butler (not sure if you can find it anymore).  


I enlarged the chart on my computer and printed out the legend. I wrote letters on the legend next to the colors that match the letter I wrote on my tray. I also cut out the little color squares from the legend and put them in the bead slots. This only works for a project with 6 colors, this one has 7, so the other is off to the side on my bead mat.

I decided to experiment and got out my Bead Buddy Save 'n Go mini and a piece of Velux (from an old blanket). I used my Big Shot and a circle die to cut circles in the Velux fabric and then glued it to the inside of my Save 'n Go mini. I can now do a project with 12 colors!! So far, it works GREAT!! I can close it and the beads do not move around.  I do remove the legend before I close it to make sure I get a tight fit. Not sure that matters, but better safe than sorry. If you are not familiar with the Save 'n Go, it is made by The Bead Buddy and comes in different sizes. It is hinged with a squishy bead mat on both sides (lid and bottom), so when you close it all your project parts stay in place. 


That is if for now! Take care.


Wednesday, June 1, 2022

Still More Beading

 I dove back into the beading box and found another project I picked up at a show from i-bead.com. Sadly I do not see it on their website right now, but they do have lots of other nice things!!

It is called Pearlicious and designed by Any-Loh-Kupser. It was not too hard and I finished it in an evening.


It came with a snap clasp which I have never used before and she gave a hint on how to attach it to the end so it would lay flat. I will try to explain. You string beads then run it though the clasp and string the same number of beads before the clasp and the tun it though the center bead of the bracelet, but you go in the bead the same direction the thread is coming out. You do this again on the other side of the clasp. Your thread should be coming out of the center bead of the bracelet in the correct direction to do this. Reinforce by going through all the clasp joining beads three times. Then repeat this process with the other half of the closure. Hope that made some sense, but her directions are copyrighted so I had to tell you in my own words.

I dove back into the beading box and found a necklace that may take me a little while to finish. It uses brick stitch, but for each row they are stacked three high. This will be new for me. The project is called Bargello Pendant by Carole Collier. I am doing it from the August 1998 issue of Bead&Button, but I think it is also in her book "Three-Bead Brick Stitch: Necklace Expressions, Seven Fabulous Projects for Intermediate to Advanced Beaders".  Which a quick google search just now found it here on Amazon. I could not tell if this necklace is actually in the book, however. I do not get any kickbacks for sending you to Amazon, just saving you all a google search step.


This photo is from the magazine. I am doing the colorway on the right and substituting Delicas for the Toho Antiques, so my purple will be more blue, but I think it will look fine. Here are my substitutions in case you find the pattern and want to get going. 
A241 sub. DB1308
A705 sub. DB361
A461 sub. DB 47
A566 sub. DB 567

I do not recall where I got these numbers. I have had this project in my box for at least 15 years since I know it was originally brought up in my bead group in North Carolina.

I will try to post some progress photos as I go along. I did get the foundation row and a little bit of the next row done before I went to bed last night.

Monday, May 30, 2022

More Beading

I seem to be in a beading mood. Yesterday I was going through by bead cupboard and found a 12" square box with bead kits I have purchased over the years. Quite a few years. I decided to try and whittle the box down a bit and worked on this bracelet called "Hugs and Kisses" by Debby Rea Taylor and Amy Loh-Kupser. You can find it here on the i-bead.com website. Scroll down and look for Hugs and Kisses; the sample shown is in blue and gold. I bought this at a show and was able to get a kit with the beads. It was very easy to put together. I used the extra crystals and made earrings - there are no instructions for this, I just made them up using the basic steps for the bracelet.

It uses 6mm fire polish crystals and size 11 seed beads. Instructions include making the closures. One end (left in photo) is a kind of button made with crystals and the other end is the loop to go over the button. 


Now to go back to the box and see what else I can make! 


Saturday, May 28, 2022

In a Beading State of Mind

Last Saturday and today I took beading classes from my Don’t Worry Bead Happy Club here in my community. The first class was a combo peyote brick stitch flower bracelet and is on the bottom in this photo.

Today I made this Pretty Posies bracelet show on the top in the photo.

Thursday, May 19, 2022

Now a little Paper Crafting

Here are a few things I finished lately in the paper crafts category, but on also kind of slips over into stitching too!

First, I made this kimono using the Spellbinders Kimono die (S3-393). I used black, red and gold cardstock. I filled in the flowers on the red part of the kimono with a black sharpie rather than deal with all those tiny centers.


Next, I took a paper mache tissue box and painted it a cream color. I then put some of my smaller stitched pieces on my copy/printer and used them to decorate the top and sides!


It was lots of fun, and it sits on my work area for me to look at the pretty stitching!


Have a great day!!


Monday, May 16, 2022

Peeps!


I made this cute little pillow for my Easter display. 

It is a free chart from DMC! I used slightly different colors.


Saturday, May 14, 2022

Elements by Carolyn Mitchell

I told you a bit about this in this catch-up post from September 15, 2021. I have worked on it here and there since and finally finished it! I am not sure I will be brave enough to finish it as a tray, but I put the snaps in the corners just in case. There are so many long thread stitches, I am afraid to use it and catch them!

The colorway I chose was Fire and you can see it is well named!


It was an ANG Cybercourse that I was happy to take since in person classes were still not very common then. 

That about covers it for now!

Saturday, April 2, 2022

Beaded Bermuda Reef

 Hello!

Last Friday and Saturday I was so thrilled to attend an IN-PERSON workshop given by my local ANG Chapter, Saguaro Stitchers. Kathy Rees of Needle Delights Originals taught her Beaded Bermuda Reef. It was a very fun project and not too big. We used 8" x 16" stretcher bars. It is full of lots of fun thread colors, stitches and textures.


Here is the teacher's piece:


I enjoyed it so much that I kept working on it and it is finished! Now to find a good framer. 

The following photos show progress as the class went on and I as I stitched at home. 

First steps. It is so fun to be in class with other people and the teacher!


Notice the zig zag pattern close up below. The top one has been outlined, the bottom has not. What a difference it makes!!


All the stitching is done, now to add the beads!

We made the beaded fringe in class. Below is my progress to see if it is long enough.

Here is a close up of the beginning of the beaded fringe. Cool how it looks so much like coral!!


Here is my finished piece. WOO HOO!!


This workshop attracted me because of the colors and the beading in the middle. It did not disappoint, and the teacher/designer was wonderful as well! I would definitely take a class from her again.

I have some virtual classes to catch up on and I am taking classes at the ANG Seminar this summer in Tucson. It is the 50th Anniversary of the Guild and I can't wait!!


Happy Stitching!!


Monday, February 14, 2022

Happy Valentine's Day

I finished this fun little stitched design from the Rainbow Gallery by Erica Michaels. It is a free chart from Rainbow Gallery, part of the 2000 Stitcher's Surprise Series. It is not stitched as designed, I used it as a monochromatic challenge where we use one color of thread. I did it all in DMC Variations #4210. I used bee charm I had on had (shown in second photo). I used some rose colored 28 count even weave I had in my stash and stitched it over two.


I finished it into a little pillow to put out as part of my February display. This is the first time I sewed on rick-rack. I think I did ok, if I may say so myself.

That is all from here!

Happy Stitching!!


Tuesday, February 1, 2022

A Couple of Flat Folds

 Last month I taught a workshop to my local needlework club on how to do a flat fold finish.

I had 4 students and it went quite well, all but one had their pieces all put together except for the cording. We have started back our monthly programs and February we will be making twisted cord!

Here are two pieces I finished in the flat fold manner. The cactus has purchased cording and the heart has cord I made using two colors!


The Saguaro is from a Banar designs kit from the 1990s and the heart is from a local Littleton, Colorado needlework shop retreat. So, I do not have a lot of information on either of them other than that.

I had planned to put the Saguaro in our March expo sale, but I like it too much and I am keeping it!! But I have the chart someplace and can make another one for the sale. Maybe not for March, but there should be one or two sales in the fall. 


Monday, January 31, 2022

What's for Dinner?

Tonight, I decided to use my Pampered Chef Rockcrock Dutch oven to make Chili!

It was super easy. I first saluted some onions in the pot:


Then I pretty much followed the recipe on the package of Pampered Chef's Chili Mix. 
My personal touches were to use 2lbs of ground sirloin. Next time I may try the recommended 1lb, but I wanted leftovers - boy do I have leftovers!!!!! I chopped the beef up using one of my favorite tools, the Mix 'N Chop.

I also used two 15 oz cans of beans - one can of red kidney and one can of pinto, original recipe only called for one can.


It passed the hubby test. He asked when I would be away for lunch this week so he could have the leftovers!!

Shop with me 27/7 here: Home | Pampered Chef US Site

That is all for now. For my next post, I plan to show you a couple stitched items, so please come back.


Saturday, January 15, 2022

New Cooking Gadget/Adventure

Hello, I recently became an Independent Consultant for Pampered Chef. You can find my website on my ABOUT page. I wanted to share with you this fun new product. I think it is my new favorite!

Now, before you groan and wonder if this will turn into a cooking blog, NO, this will still be primarily a stitching site. I just might throw in a few fun cooking things once in a while. I just navigate and tell stories better via a blog than on facebook (I do have a separate FB page for my Pampered Chef business by the way). Also, the company does not want us to have a dedicated Pampered Chef blog, but they do allow mention of product in our lifestyle blogs. I guess no hard sales either. So, since I tend to be a boring rule follower, I did not create a separate blog, I will just use this blog.

Here goes:

My new favorite cooking tool is the Rapid-Prep Mandoline. I have (but not for long) a traditional mandolin and as you can see there are blades and lots of chances to get cut with this one. I always worried when they were in the dishwasher, fearing them getting grabbed the wrong way and gave alerts to my hubbie that sharp stuff was in there.


Now for some photos of the Pampered Chef Mandoline:


I did not pull the cover down all the way, but the blade is below that white part and behind the gray slider. There are dials on the back to let you set the cutting type and thickness. You never handle the blade. Big plus for me!!!


It fits nicely in one of my pull-out drawers in the kitchen, right where my other mandolin used to be! There are some good product information videos etc. on the Pampered Chef website if you want more information.

That is all for now, back to stitching!